Tuesday, April 14, 2015

Chemical Tests

- Launch the lesson with this chart for students to express tings they are wondering about chemicals before they begin this investigation. 

What are you wondering about chemicals?
-          Are all chemicals dangerous?
-          Do chemicals change?
-          Can you eat chemicals?
-          What happens when you mix chemicals?


Focus Question: How can we explore our unknowns? What are some of your ideas about how to explore the unknowns?

Prediction/ Hypothesis: If we add water to the unknowns, then they might change colors, state & texture might change. 

Planning: AMSTI Chemical tests investigation kit

- In this kit, we have 5 jars with chemicals inside. We are going to solve the mystery of what each chemical is. We will call the chemicals unknowns.
-Explain why you shouldn't cross-contaminate the unknowns because the chemicals would no longer be pure.

Data:


How it feels
How it looks
How it smells
Red
Rocky/gritty
White/powdery
None
Orange
Soft /crunchy
White/powdery
None
Yellow
Clumpy/rough
White/powdery
None
Blue
Gritty
Salt/sugar
None
Green
Soft
White/powdery
None

Claims & Evidence: From this investigation, I learned that our unknowns have different properties because they all started to look and feel differently when water was added to them.

Conclusion: What did we discover from our unknowns today? In our investigation today we discovered that chemicals can change. Based on what we did in our testing with out unknown, water changed the chemicals.


Force & Balance Investigation


Focus Question: What does it mean when you balance something? Think about something you have to balance. (See saw)
- Read Marrett on the High wire. Ask students if Marrett will have more trouble walking on the high wire and why.

Hypothesis/ Prediction: I claim that when the clothespins are equal weight on each side of the cray fish it will balance because it will be stable.

Planning: clothes pins, poster board crayfish cut outs, half circle and triangle poster cut outs, Popsicle sticks.

Data: Have students spend time trying different ways to make the crayfish balance on their fingers while also filling out the chart below.


How did you balance the fish?
How did you balance with clothespins?
What Happened?
Side
Tail
Nose

Side
Tail
Nose
Fell over
Stood
Fell, stood

- After students have successfully balanced the crayfish, allow them to investigate using the semicircle and triangle cut out.


Claims & Evidence: If we find the center of our fish then we can use our pins to balance. 

Conclusion: Have students explain the investigation back to the teacher while she longs t on a class chart for the students.

What did we balance?
What Happened?
Fish/ pins
Balanced because it was stable

- We learned that...
1. The weight must be even or it will not balance.
2. The larger the base, then the easier it is to balance. 


Weather (Anemometer- Upper Grades)

Launch-  Have students share things they already know about weather forecasting as well as things they are still wondering. Discussion from this chart will lead to the focus question.


What we know about weather forecasting
What we’re still wondering


Focus Question: How do we use technology to investigate our Earth/ the weather? How does technology help forecast the weather?

Prediction: I predict the anemometer will spin if it is windy but won't if there is no wind. I believe this to be true because their would be nothing to make the cups spin if there was wind.

Planning: Dixie cups, straws, masking tape, pencils, thumb tacks.

- Have students stick the straws through the cups.
- Tape the straws to the top of the pencil with the eraser.
- Then stick the thumb tack into the eraser to hold the straws and cups in place.

Data: Have students go outside and complete the chart below to measure the wind speed. 

Number of spins
Number of seconds
(Intervals of 10 sec.)


Claims & Evidence: I claim that the wind was not blowing when I tested my anemometer because it did not spin.

Conclusion: Create a class "What we learned" chart and have students share their thoughts after conducting this investigation.

Questions: What other technology would you want to learn about that measures the weather?

Weather (Weather flag for kindergarten/1st grade)

Launch- Survey Chart and discussion leading into focus questions/ investigation.


Focus Question: What is weather? What is the weather like today? How do you know/can you sense when the wind is blowing?

Planning: Felt, cardboard strips, staples

Data: Children will take their flags outside and use the chart below to decide how hard and if at all the wind is blowing. 

NO Wind
0
Some Wind
1
Strong Wind
2

Flag doesn't move

Flag moves slightly

Flag moves a lot

-Students will then draw a picture of their flag and what happened when they took it outside. 


Claims & Evidence: We can tell the wind is moving because we can see our flag moving. 

Conclusion: We learned that wind can be seen and heard. We learned we can feel the wind. 

Questions: What kind of storms produce very strong winds? (Hurricanes & Tornadoes). How do we know what to wear everyday or when we need an umbrella? 


Life science (plant structure)

Focus Question: Do vegetable plants and flower plants have the same structure?

Prediction/Hypothesis: I think that vegetable plants and flower plants will have the same structure but they will look different on the outside.

Planning: Tomato plants, flower plants, paper plates, napkins, photographs in plastic sleeves.

Data: Have students share keywords that come to mind when they think of plants.
-Students will then examine the different plants to see if they both have all of these parts in common.
- Each group will be given two plants. The students will be put into groups and asked to examine each plant. They will they make a quick sketch of each plant to record the 4 different features.
- After students have investigated, give out pictures of plant A & B in their premature stage and growth to their mature age. Students will then be asked to determine which picture is which plant.

Keywords About Plants
Roots
Stems
Leaves
flowers

-After students have taken the time to identify the plants in the pictures, then explain what each plant is. Then have students explain if each plant has the four parts and explain where they are on each plant.


Stem
Root
Leaves
Flower
A


B


Claims & Evidence: I claim that tomato plants and flower plants will have the same structure because they both have roots, stems, leaves, and flowers.

Conclusion: In this investigation, we learned that plant A and plant B both have the same structures, but they look different. They also grow different things. One produces something edible and one does not. Upon further investigation, we also learned that plant A was a tomato plant and plant B was a flowering plant.

Questions: 

Will a tree have the same structure?
Will a fruit plant have the same structure?
Does grass have the same structure as the plants we investigated?


Static Electricity Investigation

Focus Question: What happens when we rub a plastic spoon on cloth and hold it closely to the salt and pepper?

Prediction/Hypothesis: If we use static electricity, then we can separate the salt and pepper.

Planning: Salt, pepper, plastic spoons, Tupperware bowls, Ziploc bags, carpet

Data:
Materials
What Happened
Salt (1 tbsp.)
Pepper (1 tbsp.)
Bowl
Plastic spoon
Carpet
After mixing the salt and pepper together, as well as rubbing the spoon on the carpet for about 20 seconds and holding it to the S&P mixture, the pepper began to stick to the spoon. Some salt stuck as well but not very much, depending on how close you held the spoon.

Claims & Evidence: If we have salt and pepper mixed together, then we can use a plastic spoon rubbed against cloth to separate the two variables.

Conclusion: What happened when you rubbed the spoon on the carpet and held it over the salt and pepper mixture? What caused the S&P to stick to the spoon? We learned that static electricity is made up of positive and negatively charged particles. The particles attract to each other and we observed this while watching the salt and pepper stick to the spoon.

Questions: Is there any other items we could use to demonstrate static electricity? What else could we rub the spoon on the get the same reaction with the salt and pepper?

Physical Science (chemical change (balloon/vinegar/baking soda investigation)

Focus Question:  How can you create a chemical change?

Prediction/ Hypothesis: If we combine vinegar and baking soda, then the two will begin to fizz.

Planning: Baking soda (1 tbsp. in each balloon), vinegar (1/4 cup in each bottle), water bottles, balloons

- Each student will be given a balloon and a bottle. In the bottle there will be vinegar and in the balloon there will be baking soda. When you get your materials, place your balloon opening over your water bottle opening. Carefully pick up your balloon and let the baking soda fall into the bottle.

Data:
What We Tried
What Happened
Balloon filled with baking soda (1 tbsp.)
Vinegar (1/4 cup) in the bottom of the bottle
Putting the filled balloon on the bottle
The balloon immediately began to inflate. The vinegar and baking soda combining made lots of white fizz that slowly turned into a milky liquid. Balloon slowly began to deflate after a few minutes.

Claims & Evidence: We claim that when you combine a solid and a liquid, a chemical reaction can occur. This was evident when we added vinegar to the baking soda and a gas was formed.

Conclusion: Why did the balloon inflate? We combined our baking soda (solid) and vinegar (liquid) and that made a gas. The gas inflated the balloon. In this investigation could we take this gas and break it apart to make vinegar and baking soda again?

Questions: Do you think the amount of vinegar and baking soda had to do with the balloon filling up with gas? What other substances can you put together to make a gas?


Earth Science (Sunscreen experiment)

Focus Question: Why do we wear sunscreen?

Prediction/ Hypothesis: I think the sunscreen with the higher SPF will show as more protective for our skin because the number on the bottle is higher.

Planning:
  • 1 Sheet of 81/2” x 11 clear plastic acetate (at local office supply stores)
    Black permanent marker
    Three “protection levels” of sunscreen SPF 8, 15 and 45.
    Photoreactive paper
    Plain cookie sheet
    9x13 Pyrex dish of water
  • 1.)   Explain to students that they will be looking at what is really happening when they smooth sunscreen onto their skin.
    2.)   Take the clear plastic sheet. Draw a straight line vertically and horizontally through the middle of the sheet making four different “panes”. Mark one SPF 0, another SPF 8, then SPF 15, and finally SPF 45.
    3.)   Measure about ¼ teaspoon of each kind of lotion and use your finger to smooth it carefully over its appropriate “pane” on your plastic. (Remember one pane will have no sunscreen at all).
    4.)   Quickly remove four pieces of photoreactive paper from their protective envelope, place them on the cookie sheet, and then cover them immediately with the plastic sheet you just prepared.
    5.)   Place the cookie sheet in full sun, with no parts shaded, and leave it there for 1-4 minutes, or until the SPF 0 pane looks nearly white.
    6.)   Bring sheets inside, and carefully take the plastic sheets off. Then rinse the papers in the water tray and remove to observe. 
Data: 
Predictions
Results
SPF 0
There will be no protection because there is no sunscreen.
This one had the most exposure to the sun. It turned white as the sun hit it.
SPF 8
This one will be the least protective besides no sunscreen.
This one looked white, but it looked like water. It might not protect us for as long because it looks thin.
SPF 15
This will be the second best sunscreen to protect our skin.
This one was the whitest. It looked thicker than the others and had less blue coloring showing through the sunscreen.
SPF 45
This will be the best protection for our skin.
This one showed the color blue all over and less white.


Claims & Evidence: We claim that SPF 15 had the most protection from the UV rays because it had the most white left underneath on the photoreactive paper.

Conclusion: We learned that the higher the SPF does not mean the more protection from the sun.

Questions: Do clothes help to protect our skin from the sun? Do animals get sunburned as well?


Earth Science (Difference in dirt investigation)

Focus Question: Is all soil the same? (Yes, No, Maybe) on smartboard


Prediction/ Hypothesis: I predict that all soil is not the same because some feel different from other and are different colors.

Planning: Materials: 4 types of soil, Plastic cups, Aluminum pans, 4 color stickers, Paper divider for dirt, Plastic gloves.

-  Each group will receive 4 cups containing different types of soil with the appropriate color on it and the paper divider. Observe the different types of soil using senses and complete a data chart in science notebooks. Complete data chart as a whole class.

Data: 

Soil TypeWhat do you see?How does it feel?Interesting observations
RedClumpyClumpyIt looks like it might have been found near a river.
BlueBrown/OrangeRocky and mushyIt has roots in it.
GreenGrittyFluffyMaybe found near the shore- sandy
Made a text-to-text to connection to a book.
OrangeDarkestDampNo smell- It looks like it was found in the yard. It looks the most familiar. Found worms in it.

Claims & Evidence: All soil is different because it looks and feels different.

Conclusion: In this investigation we learned that there are many different types of soil depending on where the soil is found. 

Questions: What are the components of soil? What is it actually made of? 

Monday, April 13, 2015

Gravity (Egg) investigation

*First read a book- "Why Can't I Jump Very High", "Gravity's a Mystery", "I Fall Down"

Focus Question: Why do we come back down to the ground when we jump in the air? How does Gravity work on an object?

Prediction/Hypothesis: I think using the cotton balls, sponges and felt to wrap the egg will keep it from breaking because they will act as a cushion on impact.

Planning: Hard boiled eggs, string, felt, cotton balls, aluminum foil, pieces of sponge, paper plates, hole puncher, scissors
*Our group used 2 pieces of sponge, 2 pipe cleaners, 3 pieces of felt, 1 paper plate, 2 cotton balls, 3 pieces of string.

Data:

What We Tried
What Happened
Support cushion, parachute
Egg cracked, although it slowed down the fall
Equal support with sponges, cotton balls, felt and aluminum foil around the egg
Egg cracked
Resistance with paper plate used as a shield
Eggs cracked, didn't resist air well


Claims & Evidence: After much trial and error, we decided that if you could slow the egg's fall then it wouldn't crack. The parachute is what we used to help slow the egg down.

Conclusion: In this investigation we learned that the egg needed to be slowed down while falling to keep from breaking. We achieved this by building a parachute to slow its fall.

Questions: Do real life parachutes work in the same way? Does gravity pull on parachutes?

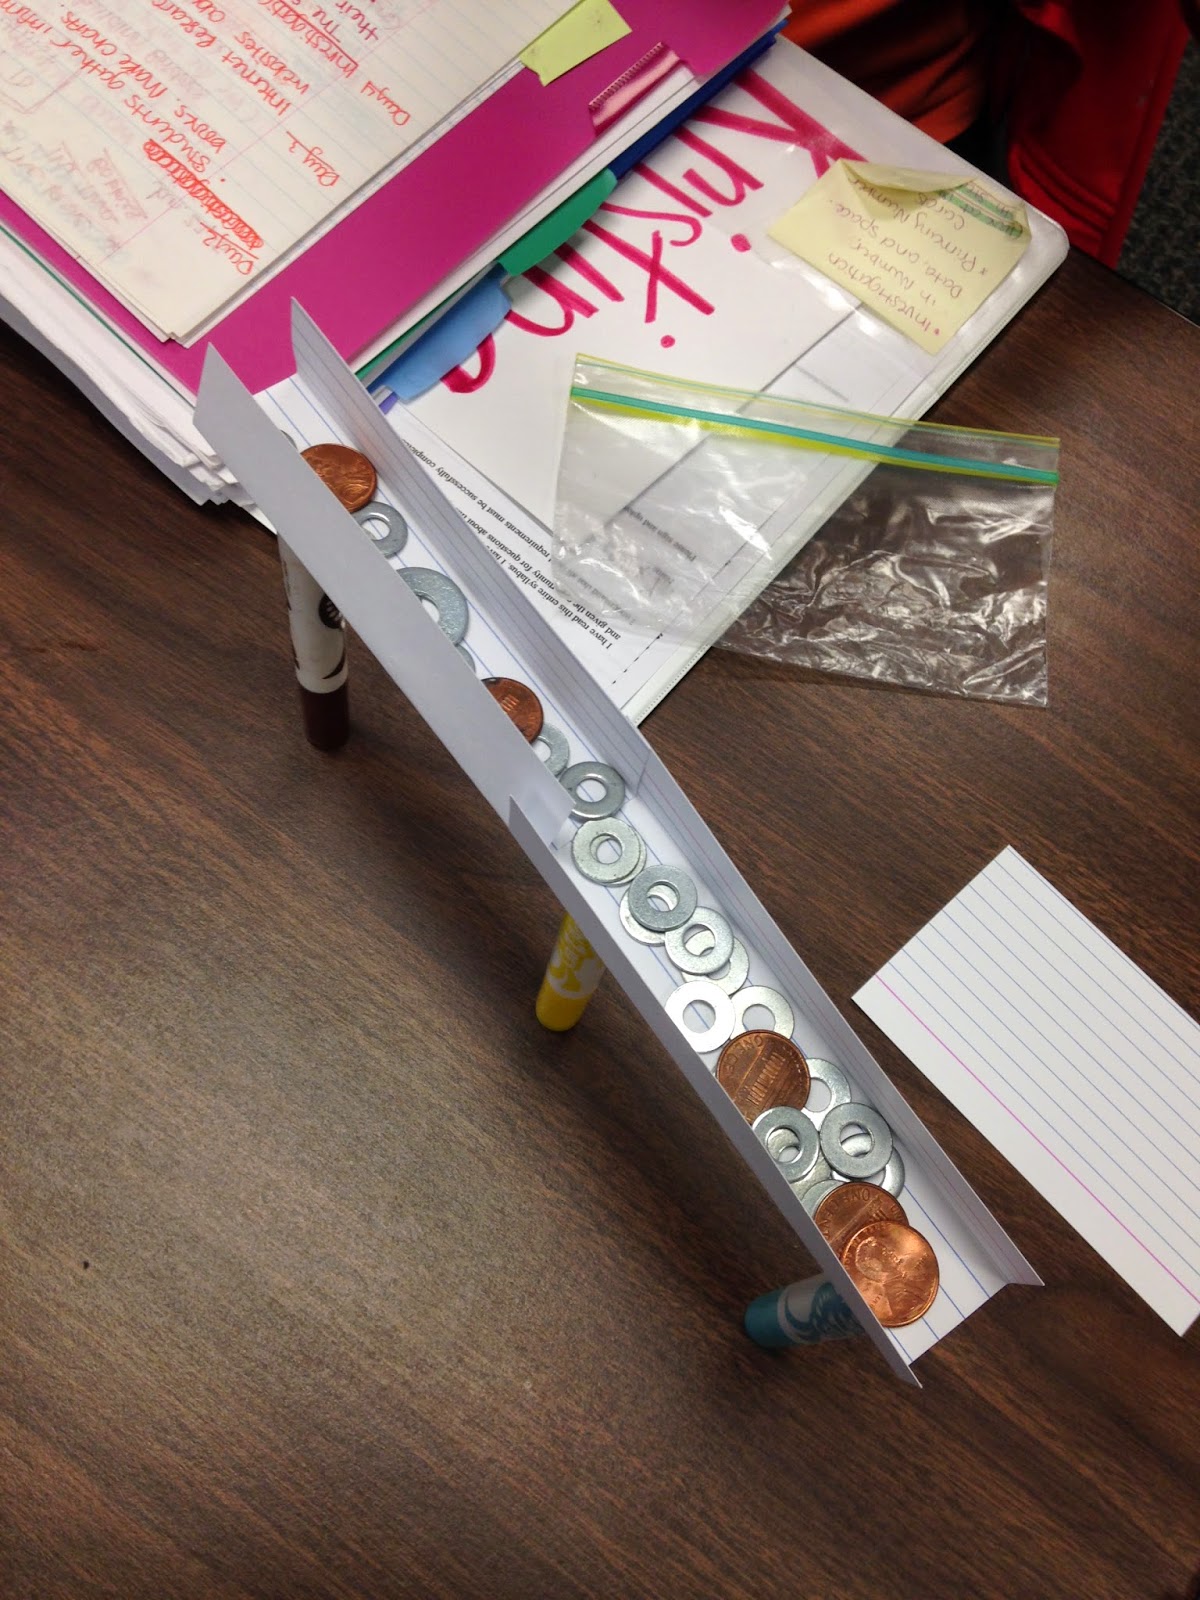
Building Bridges

Focus Question: How are bridges supported to hold weight?
-Have students share their past experiences with bridges.
-Have students share other questions they might have about bridges.
* Use their questions to start discussion
-Think about how you can test your questions. What type of investigation can we use to model and test your question?

Prediction/ Hypothesis: If the markers are closer together, then the bridge can hold more washers and pennies. 

Planning: index cards, markers, multiple size washers, pennies, Ziploc bags
-Use the markers as the support for the bridge, the index cards will be the actual bridge. Use the pennies/washers to test the sturdiness of the bridge and see how much it will hold. 

Data:


Claims & Evidence: We learned that the lower the bridge is, the more stable it is. We also discovered the shorter the bridge was, the more the support needed to be spread out and a taller bridge would need more support. 

Conclusion: So in this investigation, we learned that bridges need equal supports to hold weight. We also learned that if the markers (support) are closer together that the index cards (bridge), will be able to hold more weight (washers & pennies). 


Paper Helicopters

(Background info. for this lesson- The shape of the rotor blades makes it spin when dropped fro a height. Gravity pulls the helicopter down. The air resists the movement and pushes up each rotor separately, causing the helicopter to spin.

Focus Question: What causes a helicopter to stay in motion and deflect gravity (spinning)? 

-Has anyone ever flown in a helicopter, what does it feel like? If students have never been in one, read a book or find a short video to show the class.

Prediction/Hypothesis: If  I make the blades thicker, this will cause the helicopter to stay in the air longer and pin more. 

Planning: scissors, paper, pencil, paper clips

Data: Make a model in front of the class before students begin to build on their own.


What worked
What didn't work
The thicker the paper, the more successful.
Letting it fall from a higher elevation.
Having thick blades made them floppy
Trimming the blades to make them thinner.
Flick my wrist when dropping the helicopter.
Having the paper clips on the bottom.
Putting two paper clips on the side made t work better than two on the bottom.


Claims and Evidence: If we change the size of the blades (variable) the air will circulate better. 

Conclusion: So in this investigation we were able to explore how some things fall and how varying the size of the rotor blades, the shape of the rotor blades and the weight of a paper helicopter affect the way a helicopter spins. 

Questions: What did you notice about the spins for each helicopter? Did they spin clockwise or counterclockwise? Why? How can you change the spin? Does the weight (number of paper clips on the stem) change the spin? Which combination made the best spinning helicopter?

Saturday, January 24, 2015

Pasta & Marshmellow Towers

Focus Question: 
How do engineers build strong towers? How do they make them safe?

Prediction/Hypothesis: 
We believe that using multiple pieces of marshmellows and pasta on the inside of the tower as well as base supports around the outside will maintain the strength of the structure as we build it taller.

Planning:
Materials- Pasta and marshmellows

Data:
19 marshmellows, 44 strips of pasta


Claims and Evidence:
We claimed that the structure would need support from the inside of the tower and along the outside of the base. We found this to be true because the tower began to collapse without the extra support. 

Conclusion: 
Our group learned that having support on the inside and around the base of the tower were important in maintaining the structure of our tower. We know this to be true because we tried to build it without the support and the tower began to twist and fall down. 

Questions:
Why do you think the extra support is necessary for the structure of this tower? 

Sensory Bag

Focus Question:
How do scientists use their senses to learn about the world around them?

Prediction/Hypothesis: Predict what is in the brown bag without looking, only using our senses, what you can touch and feel, through the outside of the bag.

Planning:
Brown paper sack, washer, paper clip, foam paintbrush, marble, plastic straw, toothpick
- Have students explain the sounds it makes when you shake the bag and what it feels like when you touch the bag, then have them predict when they think might be in it.

Data:


Claims and Evidence:
We discovered that using our senses helped us make good predictions abot the size, feel, and sound of the items in the bag.
- I think there will be a paper clips, marble, and a washer in the bag. Not sure what the other objects without looking in the bag.
My prediction about a paper clip and a washer came true after we looked into the bag. We also discovered a plastic straw, toothpick and foam paint brush.

Conclusion: How can we look closely at objects in our world to learn more about them?
In this investigation, I (we) learned that scientists use their senses to discover the world around them. How can we look closely

Questions:
What other situations can you think of you would need to use your senses to help you solve a problem?

Thursday, January 22, 2015

What does a scientist look like?

Focus Question:
What does a scientist look like? 

Prediction/Hypothesis:
I think a scientist is someone who explores and investigates the world around them. This doesn't mean that they have to be in a laboratory or inside an office. Scientist can work outside with plants, animals, rocks, and many other specimens as well. 
- Get with a partner and make a prediction about what you think your partner's scientist will look like after they explain their predictions to you. 

Planning:
Paper, pencil

Students will get with a partner to share with one another what their idea of a scientist is. The students will then draw what their idea of a scientist is and explain what they are doing in the picture. 

Data
(Describing what a scientist looks like to them on their drawings) Details within each students drawing that makes their scientist unique. 

Claims and evidence:
Scientist can be anyone who is interested in learning more about the world around them. 

Conclusion:
In this investigation, I (we) learned that when most people think of a scientist, they think of an old man in a lab coat working in a laboratory but this is just a stereotype. My hypothesis was correct because a scientist can work with a number of different subjects not just one needing to be studied in a laboratory. 

Questions:
 Compare your scientist with your partners drawing. What about your drawings are alike? What makes them different?